
Christmas season is here and I’m SO EXCITED to dive into all of the fun holiday activities with my littles! We’re kicking the month off strong with candy cane week- sweet, minty or fruity, conveniently shaped like a “J” for letter recognition practice- they’re the yummy Christmas treat that can’t be beat!
–Literacy:
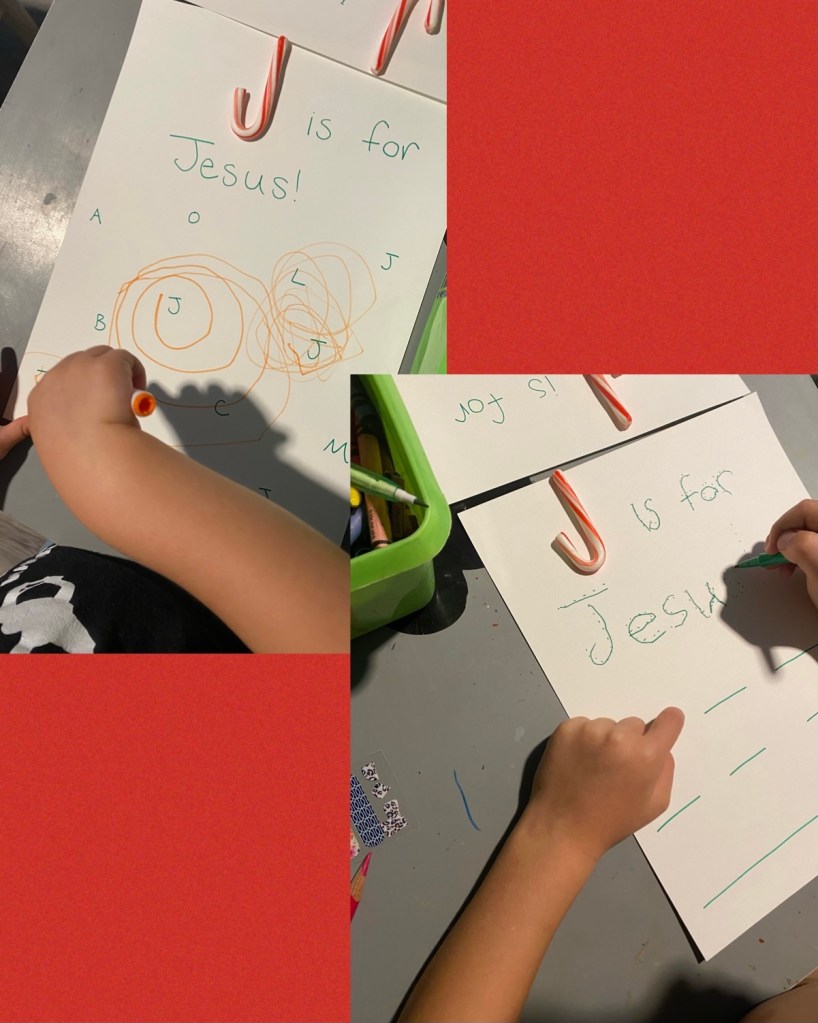
-J is for Jesus candy cane letter practice: I placed an upside down candy cane on each of my little’s papers and asked what letter it was (J!) I said “We celebrate Christmas because it’s Jesus’s birthday- and candy canes make a letter J- for Jesus!” Then I had my 3 year old search for and circle the letter J’s I’d hidden on his page. My 5 year old practiced writing J’s and Jesus neatly (I just hand made the worksheets- it took 3 minutes tops!)
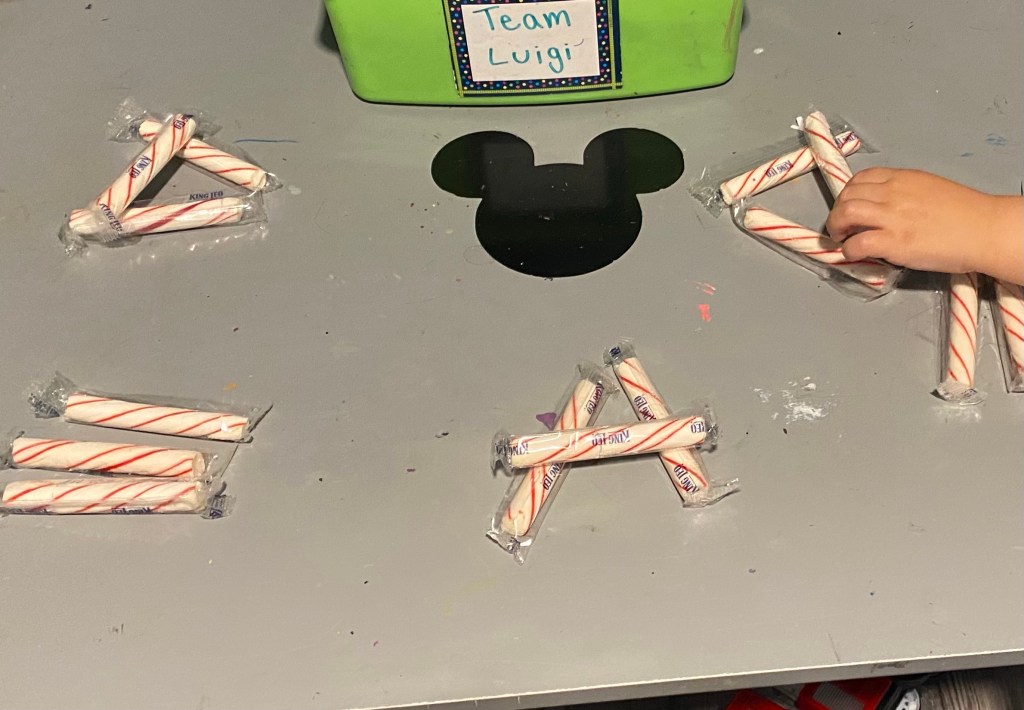
-Make letters with candy cane sticks: We went through the alphabet and I challenged my littles to make each letter using old fashioned peppermint sticks– which came in wrappers so we didn’t have to throw them out after! You can also break the curve off of some candy canes and use them instead.
–Candy cane emergent reader: This little reader was great for both of my boys- it reviewed color words for my 5 year old and identifying colors for my 3 year old as we colored each picture according to the text!

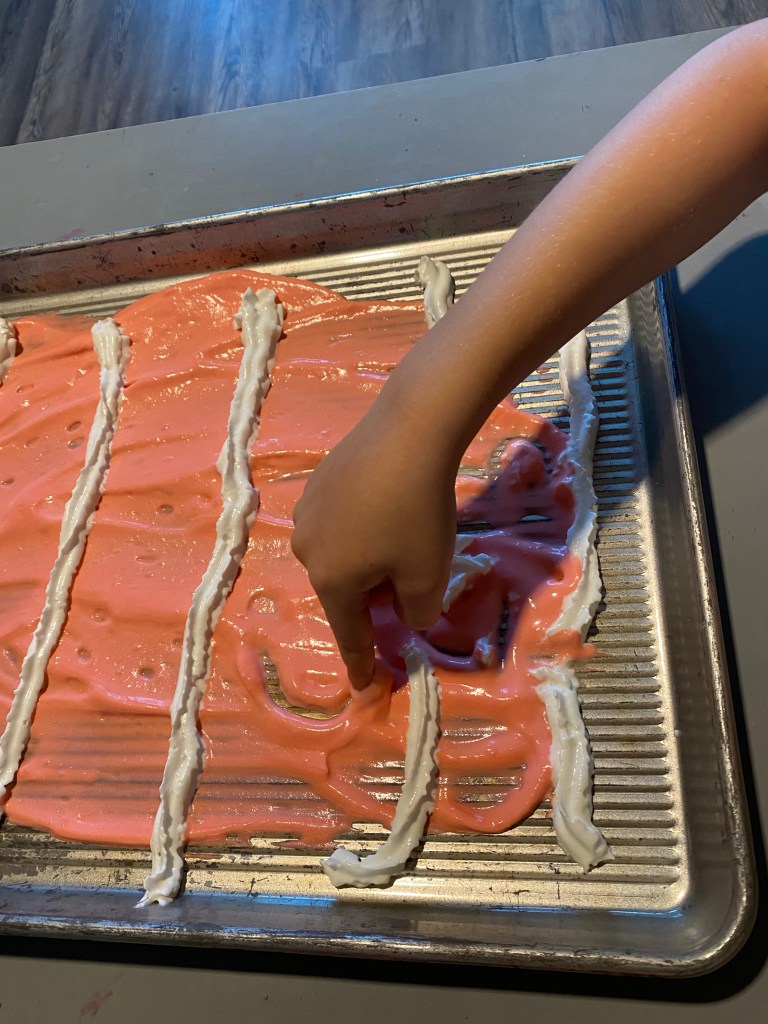
-Peppermint cream letter practice: While technically not candy cane, this activity fit the bill and my littles both loved it! You just mix some peppermint extract and red food coloring in Cool Whip (we used spray whipped cream and it was waaaay too runny) then spread it on a cookie sheet. You can add in white stripes or swirls if you like! Then call out each letter and have your little practice writing it in the cream- they can lick their finger between each number for incentive of course!
-“Candy canes are…” story prompt: This week my little wrote a story using the sentence starter “Candy canes are ______.” Each day he added a new sentence with something that described candy canes (ie. Candy canes are sweet. Candy canes are colorful.)
-Candy cane book list: Confession- we didn’t actually read these because our elf brought us J.K. Rowling’s “The Christmas Pig” and we’ve been reading that instead, but here are some candy cane themed books your littles may enjoy!


–Math:
-Counting candy cane stripes: I pointed to the stripes on a candy cane and helped my littles count how many there were- on ours there were 40! Then we examined the candy cane closely and observed there were only like 6, they just kept going around and around so it looked like 40.

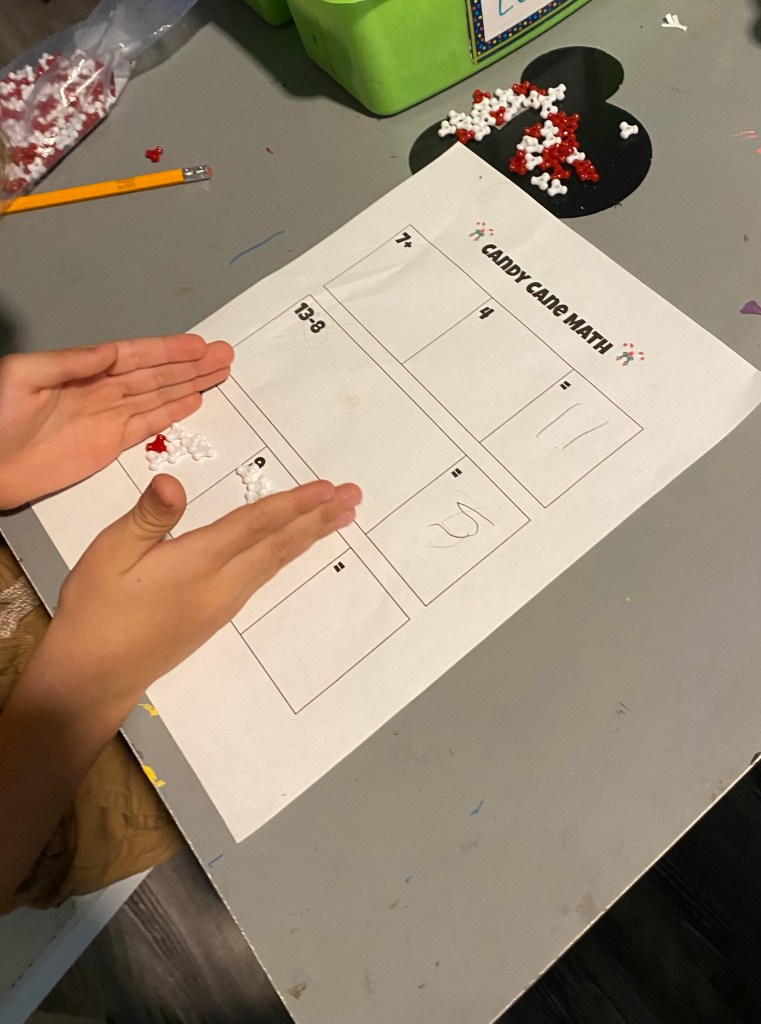
–Candy cane math: I intended to do this with peppermint circles but my boxes were too small for them so we ended up just using red and white beads. You can edit the numbers on the document to suit your little’s math ability! Basically for addition they build each number in each box, then count up the total and write it in the last box. For subtraction they build the first number then take away the second (all in the same box).
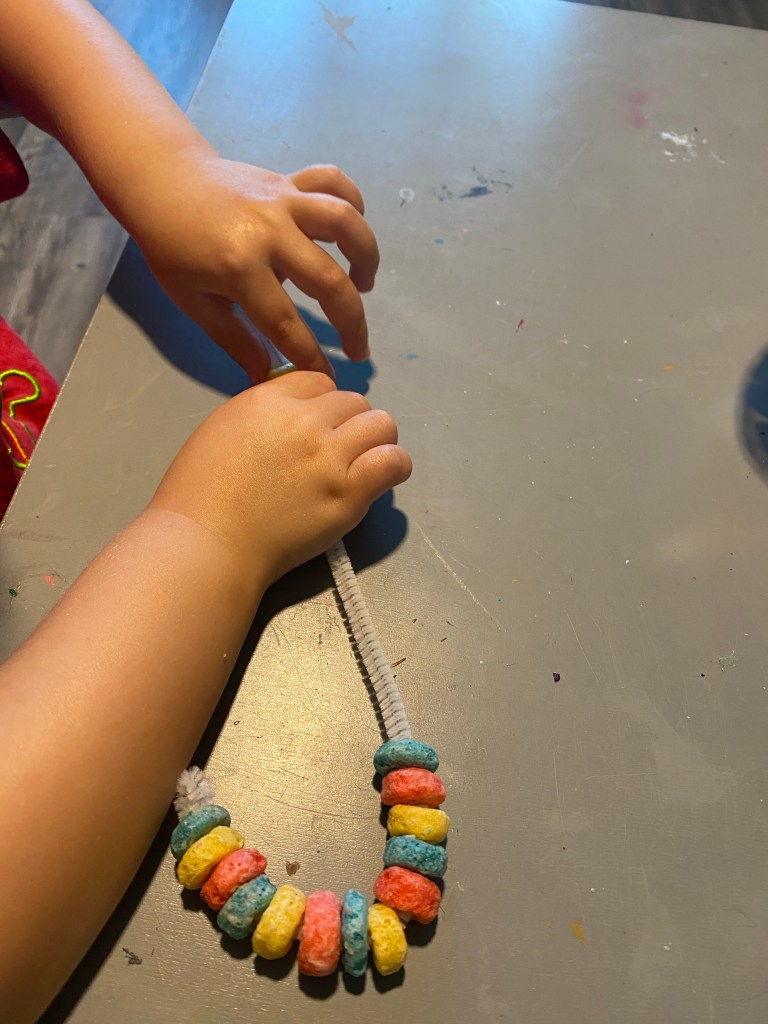
-Candy cane pattern building: For this activity I had my littles thread Fruit Loops on pipe cleaners to make repeating pattern. I got this idea from My Joy Filled Life.
-Candy cane pattern coloring: I printed some candy cane pictures then we reviewed patterns and discussed the actual patterns we saw on real candy canes. Then I had my littles choose colors (I had my 3 year old pick 2, my 5 year old 3) and use them to make a repeating pattern by coloring their candy cane picture (we used dot markers to color, but regular markers or crayons are fine too!)

-Candy cane bead count: For this activity I gave each of my littles 5 white pipe cleaners and placed some red beads in a bowl in the center of the table. Then I gave them each a flashcard (my 3 year old worked on 1-5, my 5 year old worked on 11-15), had them identify the number then thread that many beads on one of their pipe cleaners (which was great fine motor practice too!) I got this idea from Nurture Store.

–Science:
-Sense of taste candy cane sampling: We reviewed the 5 senses then my littles used their sense of taste to guess what flavor candy cane I popped in their mouth while their eyes were shut (you can get a Starburst set that has 3 flavors! Then I also got the chocolate mint- my fav- and we had the regular mint mini ones too!)

-Inquiry: What is the effect of different liquids on candy cane stripes? I asked my littles what they thought would happen to the striped on candy canes if we put them in water, vinegar and milk and why they thought that. Then we poured 1/2 cup of each liquid in sperate bowls (I microwaved the milk for about 20 seconds first so they were all the same temperature while discussing what variables are with my littles (all the parts of an experiment like temperature, the type of liquid, the amount of liquid and the candy) and how they should all stay the same except one when experimenting like a real scientist- in this case only our liquid was changing so we wanted to make sure the temperature of the liquids was the same- might as well start the scientific process correctly at an early age right!? Then we plunked in some mini candy canes and watched them. Surprisingly the water made the stripes disappear first!

-Peppermint bark states of matter review: First we observed some candy canes. I asked my littles what state of matter they were (we’ve already learned this, but if it’s new to your little, go over solids, liquids and gasses first and their attributes) and how they knew that. Then I crushed one with a kitchen mallet and asked if I had physically or chemically changed it (again, we’ve gone over this previously…if you haven’t you can use it as a demonstration of physical change or changing how something looks while keeping it in the same state, in this case, it’s still a solid candy cane, it’s just in smaller pieces). Next I let them each smash up 6 mini candy canes (still in their wrappers) for the recipe. Then I handed each of my littles a few white chocolate chips. I asked if they were solid, liquid or gas and how they knew. I asked what they thought would happen if I added heat to them (they’ll melt!) I asked what state of matter they’d change to when melted (liquid…it can flow and takes the shape of the bottom of it’s container). Then we melted the chips in a pot on the stove and poured them onto parchment paper on a cookie sheet. I had my littles sprinkle the crushed candy canes on top, then we put it in the fridge to cool and eat later!

-Candy cane melting: This activity was so fun- they were really neat to play with once they had cooled down a bit! You basically make a few molds from tin foil and lay your candy canes on them, then pop them in the oven at 200 degrees for 5-10 minutes. You can observe through the door as they melt, then take them out to poke and eventually bend with your fingers until they’re entirely cooled off! A great hands on melting/cooling experiment! The candy never gets liquid, but it’s definitely malleable which makes for great science discussion! I got this idea from Preschool POWOL Packets.

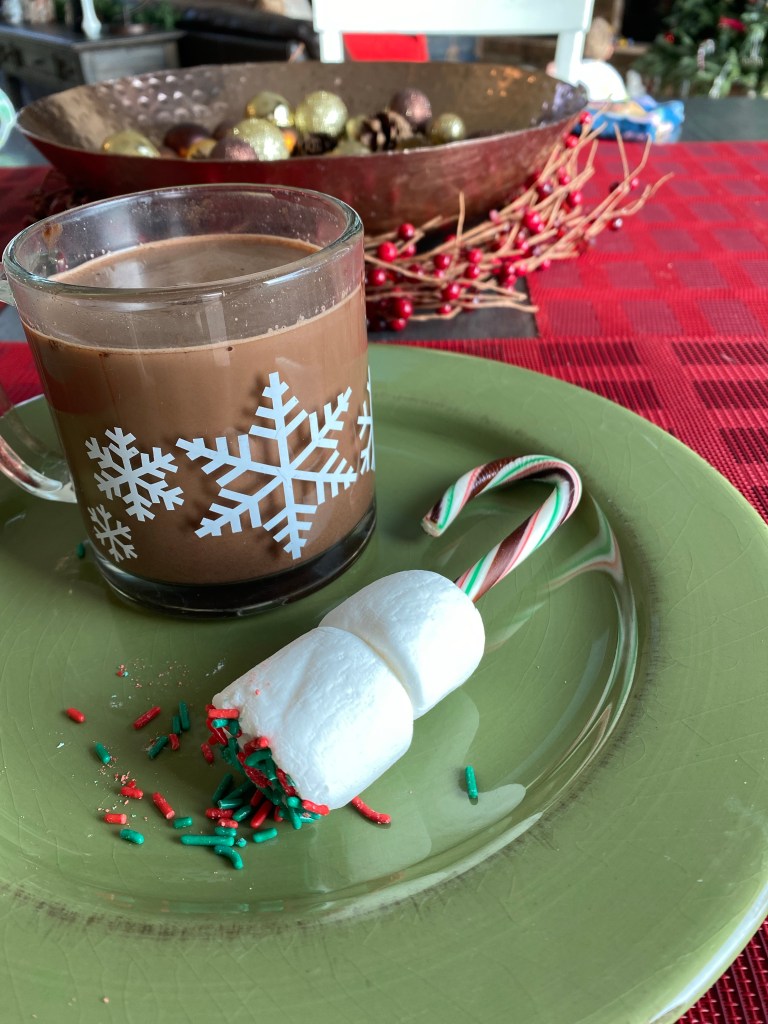
-Candy cane hot cocoa sticks: I got the idea for these cuties from Fun a Day– they’re so easy to make, and go great with all of our other melting activities as you stir them into your hot cocoa and watch them “disappear”…where did they go? How can you tell? Let your littles stir and sip and explore away!
–Art:
-Candy cane pipe cleaner and bead craft: This is so easy and comes out perfect to hang on your tree! (Plus it works on those fine motor skills- win-win-win! You just have your little put read and white beads on a pipe cleaner and bend it into a candy cane shape.

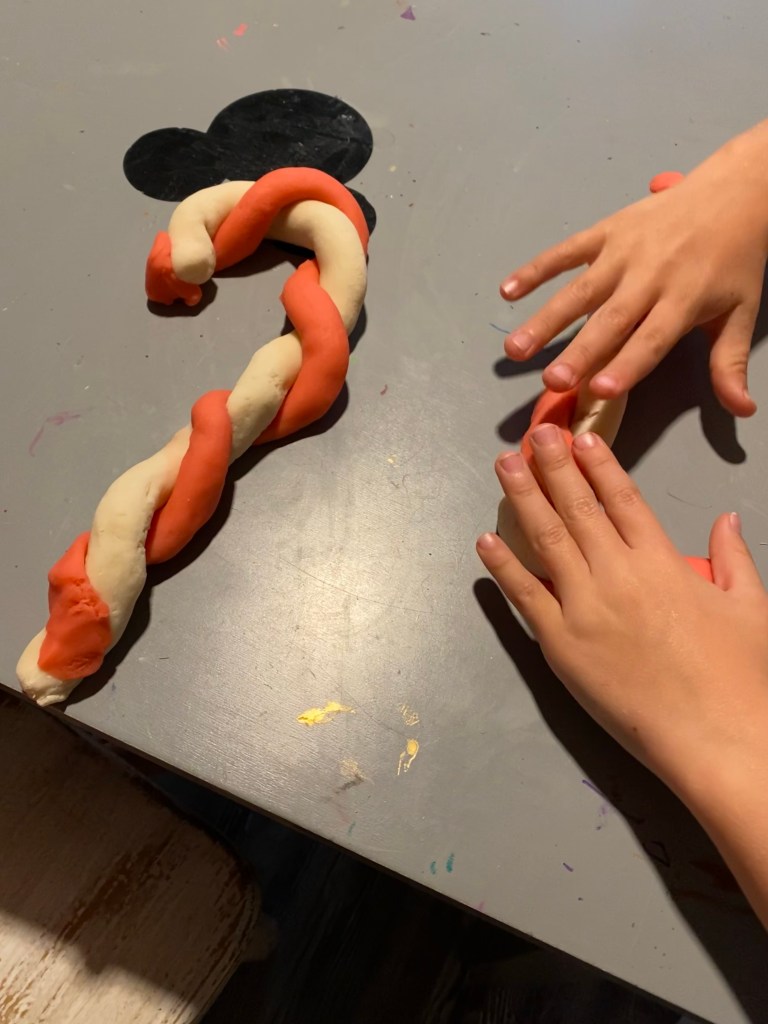
-Peppermint playdough: I got this peppermint playdough recipe from Fun a Day– we whipped up one batch, made half red and left the other half white then played with the pepperminty goodness all afternoon!
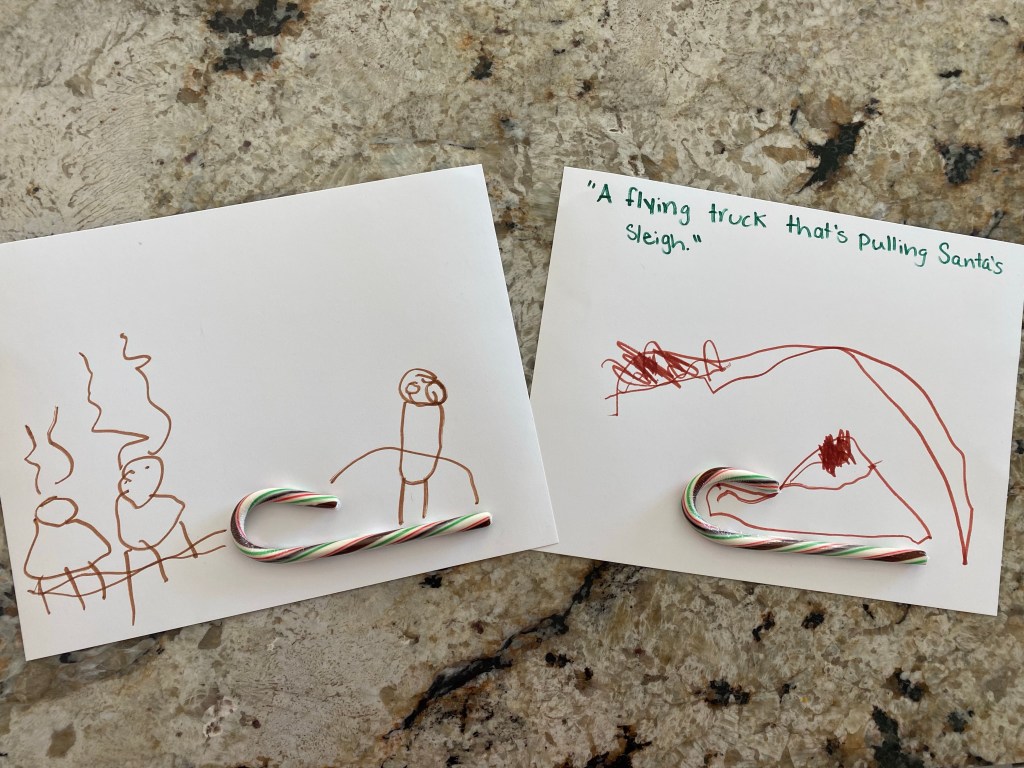
-Candy cane Santa sleigh: I glued a candy cane to a piece of paper and told my littles it was the runner to Santa’s sleigh (the part that slides on the snow). Then I had them draw the sleigh, Santa and reindeer to complete the picture (or in my 3 year old’s case, a flying truck to pull the sleigh…hahaha)
-Candy cane snowflakes: I glued 6 candy canes to a sheet of colored cardstock (I just arranged them for my 5 year old to make sure they’d fit on the page and had him glue them down). Then my littles added pom poms and sequins to decorate their snowflakes.

-Candy cane person craft: I had my littles draw large ovals on their papers, then add a circle on top with a face for the head. Then I had them glue on mini candy canes for the arms and legs! LoL This might’ve been cuter if I gave them shapes to glue down for the body and head (and maybe for hats?) but they still had fun with it!

–Extras:
-Letter of the week: Kk, each day we do a different activity focused on our letter- introduction/have your little practice it on the chalkboard (or white board), think of words that start with the letter and make a list, workbook letter writing practice, workbook word writing practice.
-Word of the week: no, each day we do a different activity focused on our word- introduction/sound the word out/have your little practice writing it on the chalkboard or whiteboard, word family list- think of other words that rhyme with your word of the week, use the word in a sentence (have your little come up with the sentence and write it for them) then have your little illustrate the sentence, and workpage practice.
-Bible verse: This month’s Bible verse is “For unto us a child is born, unto us a son is given.” Isaiah 9:6 I write each word in the verse on a post-it, stick them to the wall then have my little point to each word and read it each day all month.
-Character trait of the month: generosity…this word is reviewed and posted at the start of the month then each time one of my littles freely demonstrates generosity I use the word to specifically praise what they’re doing and encourage the trait in them. (ie. “You shared your cookie without being asked! That was so generous of you!”)
–Supply/shopping list:
- various sizes and flavors of candy canes
- peppermint sticks (straight- or break off the curve of about 5 candy canes if you can)
- shaving cream or whipped cream
- peppermint flavoring
- red food coloring
- fruit loops
- white pipe cleaners
- marshmallows
- parchment paper or wax paper
- 3 point red and white beads
- flour
- salt
- cream of tartar
- oil
